Pass Data
- Segue:適合用在有上下頁關係的ViewController之間相互傳遞資料
- Delegate:適合一對一,一個ViewController送,另外一個ViewController收
- Notification:適合一對多,一個ViewController傳遞(post),其他ViewContoller收(addObserver)
- Singleton:任意ViewController都可以讀寫,但是要注意到Singleton的life cycle
- UserDefaults:適合輕量、永久性儲存的資料
Segue的使用方式
- 呼叫特定的Segue
performSegue(withIdentifier: "showPopover", sender: sender ) 然後實作要傳遞到下一個Scene的資料
override func prepare(for segue: UIStoryboardSegue, sender: Any!) {
   if segue.identifier == "showPopover" {
       let viewController = segue.destination as! UITableViewController
       if let popoverController = viewController.popoverPresentationController {
          popoverController.delegate = self
       }
   }
}
- 呼叫特定的Segue
使用Segue傳遞到有Navigation Bar的Viewcontroller時,Navigation Bar會顯示失敗的處理方式
let nav = segue.destinationViewController as! UINavigationController
let myViewController = nav.topViewController as! MyViewController
Unwind無效的情況
- 現在有三個ViewController:
MainViewController、SecondViewController、ThirdViewController,在ThirdViewController建立unwindToMain和unwindToSecond的Unwind Segue,然後MainViewController是Initial ViewController - 一開始從
MainViewController直接跳到ThirdViewController後,因為沒有載入過SecondViewController,執行unwindToSecond的unwind segue會無效,但是執行unwindToMain的會正常跳轉頁面 - 推測原因是因為沒讀取過
SecondViewController,所以程式不知道要跳到哪一頁
- 現在有三個ViewController:
Unwind Sugue的使用方式
在想要返回的目的
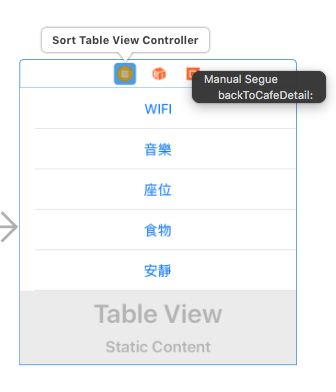
ViewController內,建立收到unwind segue後的處理函式,參數的類型為UIStoryboardSegue,這很重要!@IBAction func backToCafeDetail (_ segue:UIStoryboardSegue) { let sourceController = segue.source as! SortTableViewController self.sortItem = sourceController.sortItem if (self.cafes != nil){ self.sortedCafes = sort(with: self.cafes, and: self.sortItem) } self.cafeDetailTable.reloadData() }在發送
unwind segue的ViewController內,透過Main.storyboard建立unwind segue,先選取ViewController,然後點選此ViewController 的 Home icon,以Ctrl-Drag的方式拉到右邊的Exit icon上再放掉,剛剛建立的unwind處理函式(在這個例子是backToCafeDetail)會出現在下拉式選單內,然後選取backToCafeDetail,完成建立Unwind Segue。
- 然後在
ViewController內選取該Unwind Segue,將Identifier欄位填上backToCafeDetail(名字一樣比較不容易搞混) - 最後是在函式內利用
self.performSegue(withIdentifier: "backToCafeDetail", sender: self)的方式呼叫Unwind Segue
Custom Delegate的使用方式(參考這篇)
假設我們有兩個Class:Class1 & Class2,我們想要把Class1的某些事情委託給Class2做,我們需要如下的實作方式
- Class1.swift
// 制定Protocol protocol Class1Delegate: class { // 制定代理方法內,要實作的function func getCellTitle(_ index:Int!) -> String? } class Class1: UITableViewCell { // 宣告protocol的變數 weak var delegate:Class1Delegate? // 使用protocl變數:delegate來呼叫function let title = delegate?.getCellTitle(0) ?? "No Title" }- Class2.swift
class Class2: UITableViewController, Class1Delegate {
   //宣告要代理的Class1的實體
   var cell:Class1!

   override func viewDidLoad () {
       super.viewDidLoad()
       // 指定要實作代理方法的對象為self(自己)
       self.cell.delegate = self
   }

   // 實作代理的function
   func getCellTitle(_ index:Int!) -> String? {
       if (cell != nil) { return cell.title }
       return nil
   }
}
protocol Class1Delegate: class後面加上:class,是為了讓在Class1內宣告delegate的時候,可以使用weak屬性,避免Retain cycles。由於struct和enum都是value type,所以都只能用strong。let title = delegate?.getCellTitle(0) ?? "No Title"當delegate?.getCellTitle(0)回傳nil時,會因為??的關係,給title一個預設值"No title"
在AppDelegate創造custom delegate去呼叫某個ViewController
- 會失敗,因為在
ViewController內宣告的AppDelegate的Instance,根本不會被init,所以AppDelegate class內的delegate is always nil - 改用
Notification
- 會失敗,因為在
- UserDefaults
- 儲存陣列
UserDefaults.standard.set(self.userNameArray, forKey:"userName"
- 讀取陣列
UserDefaults.standard.array(forKey:"userName")as! [String]
- 儲存陣列
Notification的使用方式
- 在送的ViewContoller內,先宣告Notification Name,然後用post發送訊息(參數userInfo的格式為
[AnyHashable : Any]? = nil,舉例:["userInformation":userInfo],也可為nil)let myNotificaion = Notification.Name(rawValue: "NotificationIdentifier")NotificationCenter.default.post(name: myNotificaion, object: nil, userInfo: ["userInfomation":userInfo])
在收的ViewConroller內,宣告Notification Name(
要跟想要收的Notification sender的Notification Name一樣),然後用addObserver收,並實作用來收的function,記得ViewContoller消失的時候,要做removeObserverlet myNotificaion = Notification.Name(rawValue:"NotificationIdentifier")NotificationCenter.default.addObserver(forName: myNotificaion, object: nil, queue: nil, using: fillUserInfo)func fillUserInfo(notification: Notification) -> Void { guard let userInfo = notification.userInfo, let userInfomation = userInfo["userInfomation"] as? Dictionary<String,String> else { print("Failed to get userinfo") return } self.accountTextfield.text = userInfomation["a"] self.passwordTextfield.text = userInfomation["p"] }在class內
deinit { nc.removeObserver(self, name: myNotificaion, object: nil) }
- 在送的ViewContoller內,先宣告Notification Name,然後用post發送訊息(參數userInfo的格式為